If you are already familiar with creating basic families, and you want to learn about some of the more advanced features of creating families used in the Coffee cup family (revolves, sweeps, blends etc.) then continue on to the following instructions:
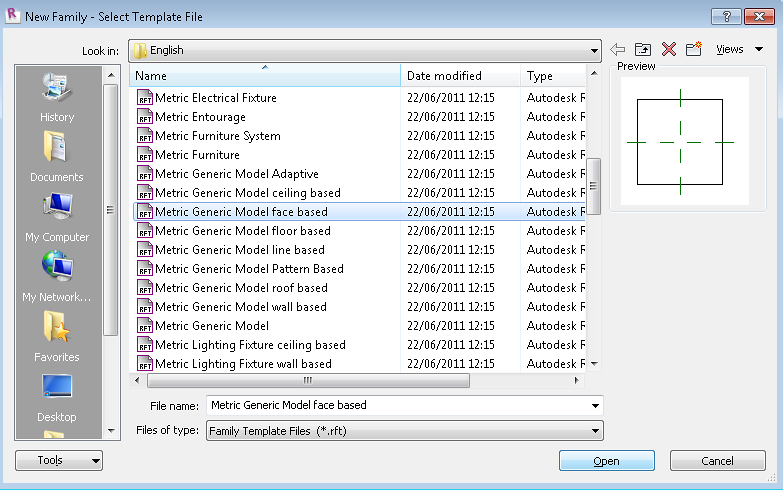
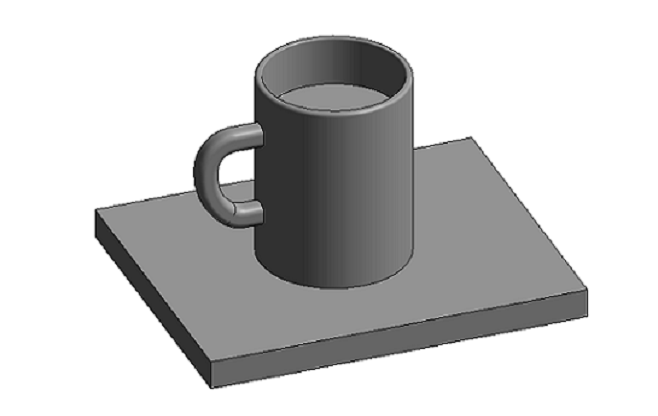
As with all new families, the first thing we will need to do is open up a template. In this case, we will use the "Metric Generic Model face based" – This will allow us to host the family to a face / surface for instance a table top. Always consider where you family is most likely to be hosted before deciding which template to use.
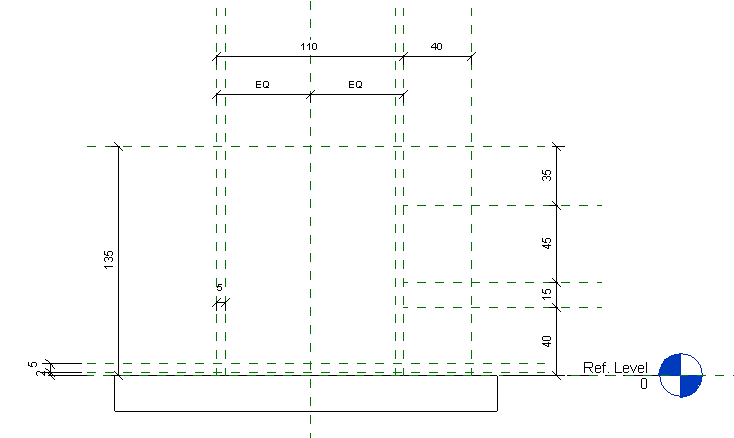
The first thing you are going to need to do is set out some reference planes to use as markers / constraints. Head to your "Front elevation" view. At this point, bare in mind that most of the templates are designed for large objects, such as roofs panels / building objects. Due to this reason, the generic reference planes will be a lot larger than we need, you will therefore need to resize the reference planes and change the scale to 1:1. Once you have done this, you should set out your reference planes exactly as you see in the image above, unless you want a slight variation to my design.
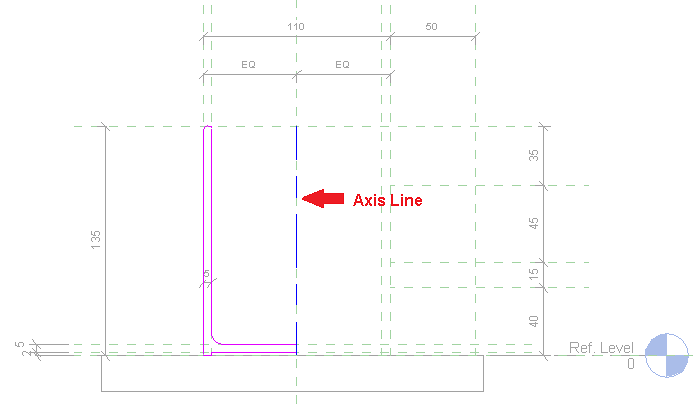
Now our reference planes are set up, we want to make the overall 'form' of the cup. To do this there are various methods, but the method I prefer is to use a solid revolve. Therefore pick the revolve tool under the 'Create' or 'Architecture' menu (depending on which version of Revit you are using). Sketch your revolve profile as shown in the image above, take note you only have to draw half of the object as the Axis line acts as mirror, or line of revolution for cylinder like forms. Follow the steps below before you finish your Revolve.
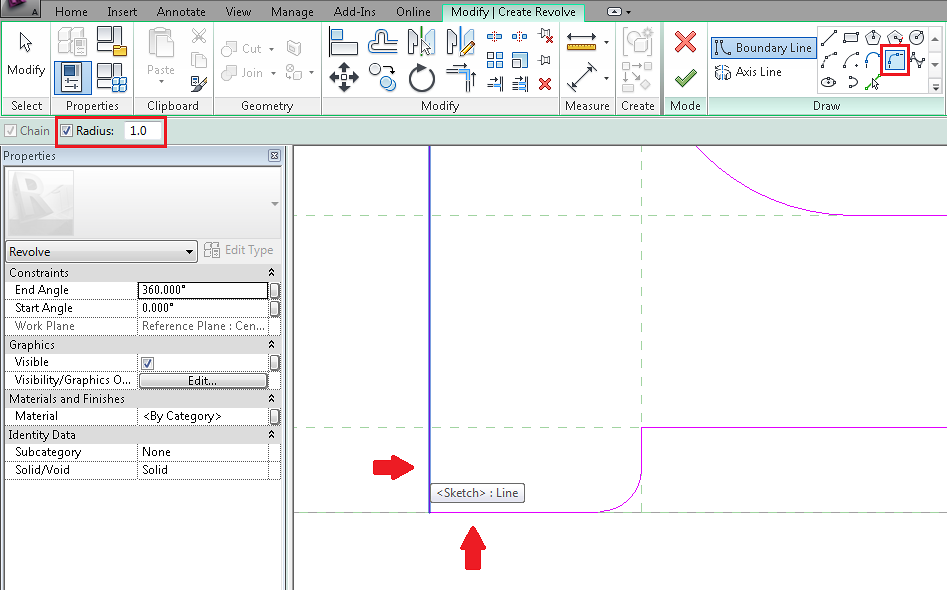
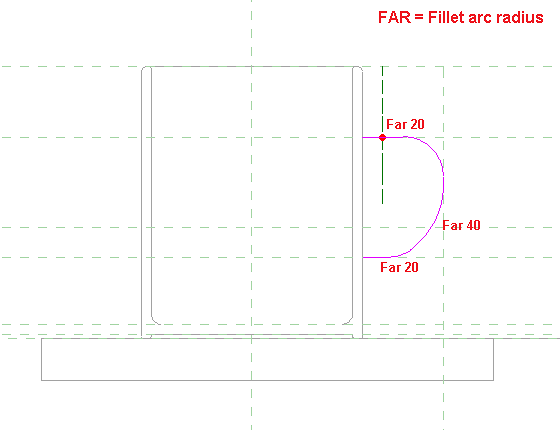
Assuming you don't want a square edged coffee cup, we will need to create profiles on the edges of the revolves in order to give a nice rounded finish to the rim and bottom of the cup. First of all, just draw the corners as rectangles as illustrated above. Once you have done this, you want to use the 'Fillet arc' tool to create the corners. As shown above select the tool and make sure the 'Radius' box is ticked in the actions bar, you can play around with the radius dimension to find your desired curve, I have used a 1mm radius in this instance. Make sure as always to lock your geometry in position with the reference planes.
If you look in your 3D view you will now see something that is beginning to look like a coffee cup. The next step is to create a handle for the cup. I am working now on the 'Right Elevation' view. You should set up as before, reference planes in your 'Right elevation' to constrain the handle as shown above. We are now going to use the 'Solid Sweep'. A solid sweep is created in 2 steps. Firstly, as shown above, we are going to create the line or the 'Path' that the desired geometry will follow. Once we have set the path, we will need to create the profile, this is how the path will be extruded as a 3D object rather than a 2D path line. Go to Home > Sweep > Sketch path and follow the instructions above to create a handle shape. Click the tick to finish your path.
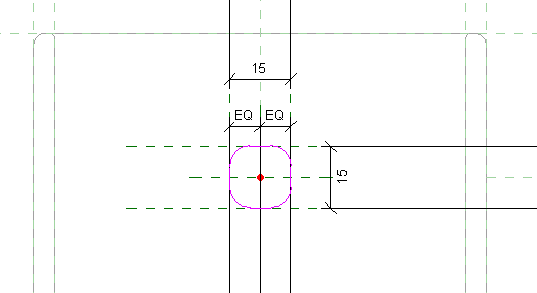
Be sure to only click the tick once, as we are yet to make the 3D profile. Click the 'Select Profile' button on the ribbon followed by the 'Edit profile' you will now be asked to choose which view you want to sketch it in, select the 'Elevation Right' You should now see a head on view with a cross with a point in the middle. The point is representing the middle of the path you have just drawn. (Imagine we are just stretching this point to create the desired thickness.) We now want to set up reference plans and sketch the profile for the cups handle, I have used an almost circular shaped geometry but feel free to play around with the profile shape. Once you have done this, click the green tick twice to complete your Sweep.
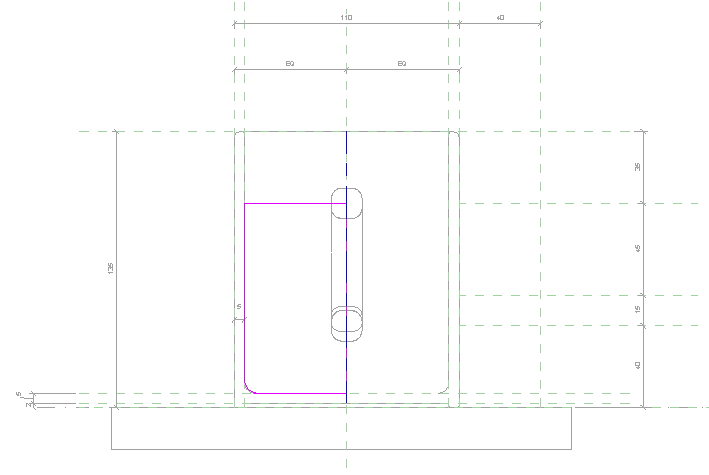
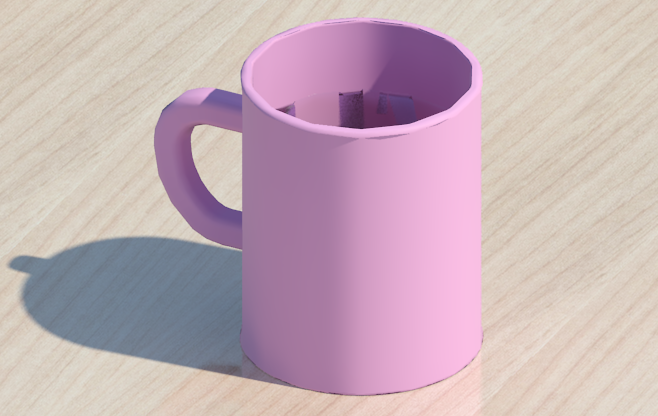
In your 3D view you should now see an empty coffee cup with your new handle attached correctly. Now we need to fill it with some coffee!! To do this, we will again use the solid 'Revolve' tool. Use a dimension line to constrain the level of your coffee, you may also want to set an instance parameter for the level of your coffee if it is important to you how much coffee is in the cup ;) Follow the image above if you wish to create an almost full cup, pay attention to the bottom corner of your revolve as you do not want it to be protruding your actual cup geometry!
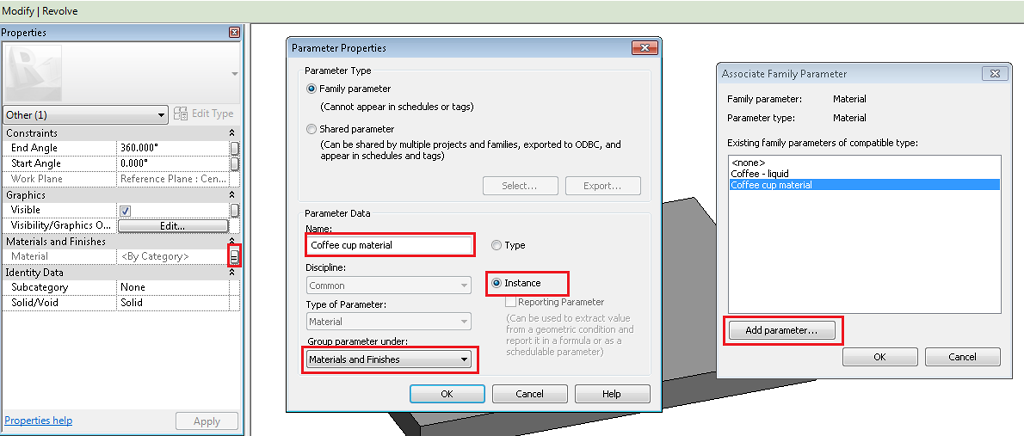
The final step we need to take in the family environment is to set some parameters for materials, so whoever will use the coffee cup family will be able to set custom materials for the cup. Assuming you want the handle to be the same material as the cup itself, create two new parameters, one for cup and handle material, and the other for the coffee liquid material. Follow the steps in the image above if you are unsure of how to do this. Finally save your family with an easily recognisable name and load it in to a project to test out.
As with all new families, the first thing we will need to do is open up a template. In this case, we will use the "Metric Generic Model face based" – This will allow us to host the family to a face / surface for instance a table top. Always consider where you family is most likely to be hosted before deciding which template to use.
The first thing you are going to need to do is set out some reference planes to use as markers / constraints. Head to your "Front elevation" view. At this point, bare in mind that most of the templates are designed for large objects, such as roofs panels / building objects. Due to this reason, the generic reference planes will be a lot larger than we need, you will therefore need to resize the reference planes and change the scale to 1:1. Once you have done this, you should set out your reference planes exactly as you see in the image above, unless you want a slight variation to my design.
Now our reference planes are set up, we want to make the overall 'form' of the cup. To do this there are various methods, but the method I prefer is to use a solid revolve. Therefore pick the revolve tool under the 'Create' or 'Architecture' menu (depending on which version of Revit you are using). Sketch your revolve profile as shown in the image above, take note you only have to draw half of the object as the Axis line acts as mirror, or line of revolution for cylinder like forms. Follow the steps below before you finish your Revolve.
Assuming you don't want a square edged coffee cup, we will need to create profiles on the edges of the revolves in order to give a nice rounded finish to the rim and bottom of the cup. First of all, just draw the corners as rectangles as illustrated above. Once you have done this, you want to use the 'Fillet arc' tool to create the corners. As shown above select the tool and make sure the 'Radius' box is ticked in the actions bar, you can play around with the radius dimension to find your desired curve, I have used a 1mm radius in this instance. Make sure as always to lock your geometry in position with the reference planes.
If you look in your 3D view you will now see something that is beginning to look like a coffee cup. The next step is to create a handle for the cup. I am working now on the 'Right Elevation' view. You should set up as before, reference planes in your 'Right elevation' to constrain the handle as shown above. We are now going to use the 'Solid Sweep'. A solid sweep is created in 2 steps. Firstly, as shown above, we are going to create the line or the 'Path' that the desired geometry will follow. Once we have set the path, we will need to create the profile, this is how the path will be extruded as a 3D object rather than a 2D path line. Go to Home > Sweep > Sketch path and follow the instructions above to create a handle shape. Click the tick to finish your path.
Be sure to only click the tick once, as we are yet to make the 3D profile. Click the 'Select Profile' button on the ribbon followed by the 'Edit profile' you will now be asked to choose which view you want to sketch it in, select the 'Elevation Right' You should now see a head on view with a cross with a point in the middle. The point is representing the middle of the path you have just drawn. (Imagine we are just stretching this point to create the desired thickness.) We now want to set up reference plans and sketch the profile for the cups handle, I have used an almost circular shaped geometry but feel free to play around with the profile shape. Once you have done this, click the green tick twice to complete your Sweep.
In your 3D view you should now see an empty coffee cup with your new handle attached correctly. Now we need to fill it with some coffee!! To do this, we will again use the solid 'Revolve' tool. Use a dimension line to constrain the level of your coffee, you may also want to set an instance parameter for the level of your coffee if it is important to you how much coffee is in the cup ;) Follow the image above if you wish to create an almost full cup, pay attention to the bottom corner of your revolve as you do not want it to be protruding your actual cup geometry!
The final step we need to take in the family environment is to set some parameters for materials, so whoever will use the coffee cup family will be able to set custom materials for the cup. Assuming you want the handle to be the same material as the cup itself, create two new parameters, one for cup and handle material, and the other for the coffee liquid material. Follow the steps in the image above if you are unsure of how to do this. Finally save your family with an easily recognisable name and load it in to a project to test out.
 |
You can now add custom colours and materials to your coffee cup as shown above, unfortunately I didn't have a liquid coffee texture, so had to settle with 'Murky water' – I wouldn't drink it, but the cup is doing it's job! Hope this helps anyone who is having problems with some of the more advanced tools in the Revit family creation environment. With the basic understanding of the tools we have discussed today, it is easy to start designing your own objects, try for yourself and see how you get on! Next time I will be discussing adaptive points in the family environment.
No comments:
Post a Comment
(“Post your comments below”),