Parameters in Revit
Parameters are placeholders for data and should have descriptive names e.g. Asset Tag, Building Code, Serial Number, etc. Revit comes with numerous families such as walls, doors, furniture, etc. which are very useful to get you started. All those families include parameters which can get generate schedules in a fraction of the time it would have taken using traditional CAD systems. Unlike traditional CAD systems, schedules are not extracted or generated, the parameter data in the schedule is the model and vice versa. You can add your own parameters to the families that come with Revit or create new families with their own parameters.If you have come from the AutoCAD world, you may be familiar with attributes which are placeholders for text e.g. Door Number for a Door. For AutoCAD attributes to work they have to be part of a block. The block can then be inserted many times into a drawing, each instance of that block can then contain different information for the attribute e.g. door number 01, 02, 03, etc. While it may take a little time to get comfortable with the parameter concept in Revit at first, the flexibility of parameters is far more powerful than AutoCAD attributes.
Parameter Types
Revit contains two types of parameters, Instance and Type. The best way to describe the difference is through everyday examples.Type Parameter
A Type Parameter is common to a type of door. D6 may refer to a double door type which is 1810mm wide x 2110mm high. The double door family may contain numerous other configurations for the size of a double door but this particular door type is 1810mmx2110mm.Instance Parameter
When you place the D6 type door in a wall in Revit, the individual door is an instance of door type D6. The instance of the door has its own unique properties which extend on the door type properties e.g. The door number is DG01.
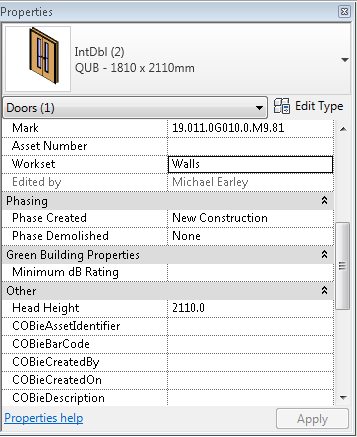
How does it all look in Revit? Click on a door in Revit. You can use the sample project if you haven't already started to use Revit. In the Properties panel, you will see the Instance Parameters for the Door. All these values are particular to this door and this door only. Revit includes a Mark which is a unique identifier for the door. The first time you create a schedule for doors, the Mark values will be automatically assigned based on the the order the doors were created. You can renumber the Marks to match your door numbering system but you may want to hold off on this as Revit can quite cleverly number doors based on combinations of parameters e.g. the Mark can be appended to the room number which can be useful in identifying the location of the door. Note - Revit will not allow duplicate Marks and will issue a warning if a duplicate is entered.
To view the Type Parameters, click on Edit Type. The Type Parameters are common to all doors of this type.

Shared and Project Parameters
Revit also has a concept of shared and project parameters. Project Parameters are particular to the current project or Revit model whereas shared parameters can be stored in a file and used for many projects. Only Shared Parameters can be used in tags, so if you want your asset code to appear on the drawings, you will need to use shared parameters.Why would anyone use Project Parameters then if the Shared Parameters offer more bang for your buck? Project Parameters are quick and easy ad should be used for ad-hoc purposes i.e. creating a zone for a rooms to allow quick generation of a zone schedule. Shared parameters require management. Office wide shared parameter file(s) should be created for information that is common to projects. For example, I have a shared instance parameter called Fire Rating. Although Revit includes a built-in parameter named Fire Rating for families such as walls and doors, the parameter is a type parameter. It is useful to have a Fire Rating parameter that can be applied to each instance of a wall or door indicating that although the wall or door type can achieve a 1 hour fire rating, this instance only requires 30 minutes performance based on fire engineering calculations. I could then create a view with all the 1 hour rated instances of walls or doors in red or filter all the doors where the fire rating for the type of door does not match the required rating.
Shared Parameters
To create or open an existing shared parameters file, on the Manage tab, select Shared Parameters in the Settings panel.
You can create a new shared parameter file from scratch or use the one I have created. Shared parameter files are simple text files but the contents are in a particular order so avoid editing them using notepad. Each Revit project can have only one shared parameter file.
The shared parameter file should be stored in a location which is accessible by all those who will use it. On larger teams, you may want to make the file, folder or drive read-only for most users if you want to restrict who can edit the shared parameters.Keep backups also.
The Shared Parameter file contains Parameter Groups and each group contains parameters. Groups just help organise the parameters into logical divisions which is useful when you have a lot of parameters. You can move parameters between groups using the Move button.

To add a parameter to a group, click the new button under Parameters. Give the parameter a logical name. Parameters can be specific to a discipline which ensures that it won't be an option when applying the parameter to other disciplines e.g. Doors parameters won't be assigned to pipes. I tend to leave every parameter as Common just in case.
The type of parameters is important. If you ever used database tools such as Access or MySQL, you will understand that data need types e.g. Text, Number, Boolean, etc. This allows databases to efficiently store and retrieve data and ensures similar type data can be compared. Text is the most common and flexible format but you cannot subtract one text value from another, Integer or Number should be used in that case. Note, the type cannot be changed after the shared parameter is created. If you need to change the type, delete the parameter and then recreate it. Make sure the type is what you want before you start to use the shared parameter on a project or projects.

Note: When creating shared parameters, avoid duplicating parameters that are already built into Revit. They will work but it is confusing as users could mistakenly enter data into one or either or both. Make users aware of the shared parameters in use throughout the office and where the file can be accessed from.
There is one more step to allow the shared parameters to be used in a project. On the Manage tab, select Project Parameters in the Settings panel. Click Add.

Select Shared Parameter as the Parameter Type.

Select the desired shared parameter. In this example I am going to select Fire Rating as an instance parameter so I can apply the fire engineers ratings to each instance of a wall.

You must select a group for the parameter. These are inbuilt groups which you will see in the properties panel. There is no right and wrong here, just use logic to select the right group. This can be changed afterwards.
Lastly, select the categories you wish to make the parameter available to. I want Fire Rating as an instance parameter for Walls and Doors only.
Now select any wall or door. Check the properties window. Under Fire Protection, you will see a property named Fire Rating.

No comments:
Post a Comment
(“Post your comments below”),