Type of Parameter
When you create a Project or Shared parameter, you must assign a type. Remember I selected Text for the Fire Performance parameter. Text is the most flexible type as it can include virtually any value. But with flexibility comes some responsibility and some restrictions. In the 4th Post on schedules, I used the equals and does not equal comparison operators to check if the value of the parameters met specific conditions e.g. does not equal FD30. This works well for text provided that there is consistency in the parameter values i.e. all 30 minute rated doors are FD30. Note - For text type parameters, Revit will make an effort to compare any values and give a result i.e. A is greater than 9 as far as Revit is concerned.If you want more explicit values, you need to select a type of parameter other than text. For example if we wanted to compare the area of a room against the brief area, we should use Area as the Type of Parameter. This will allow us to compare like with like and do smart things like getting the difference between the two areas using subtraction. Text might do this but if someone enters 300 sq.m instead of 300, Revit will treat the value as text and will not do the subtraction. By using the Area type, we also ensure that 300 sq.m cannot be entered as it is not a valid area.
In the first post on parameters, I showed you how to create shared parameters. It is at this point that the Type of Parameter must be selected. If you had chosen Text as the Type and subsequently populated your rooms with values for this parameter, you cannot now go back and change the type to Area. This is a problem that is common to database systems also as data could be lost in the translation or some fields just fail to convert as the database cannot convert text strings to numbers. Therefore it is important to choose the type of parameter wisely.
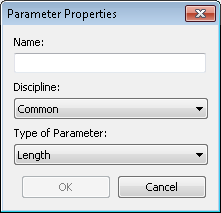
The available parameter types are:
- Text - Will accept just about any value
- Integer - Numbers only, positive or negative with no decimal places
- Number - Numbers only, positive or negative with decimal places
- Length - In units used by the project e.g. millimeters, inches
- Area - In units used by the project e.g. sq.m, sq.f
- Volume - In units used by the project e.g. cubic meters, cubic feet
- Angle - In units used by the project e.g. degrees, radians
- Slope - Similar to angle but supports additional formats such as rise, slope ratio, percentage
- Currency - In currency used by the project e.g. euros, pounds, dollars. This can be left generic also
- Mass Density - In units used by the project e.g. Kilograms per cubic meter, pounds per cubic foor
- URL - string representing a hyperlink
- Material - Any material used in the project
- Yes/No - Boolean value of yes or no.
A number of the parameter types are defined by the project units. Project Units can be changed using Project Units available in the Settings panel under the manage tab.

The project units are divided by Discipline. Units common to all disciplines are listed under Common. Click on one of the formats to change that format.

Project Units are extremely flexible and the range of options for how units can be shown is fairly self explanatory. If you are metric based you will should have all your units in metric as you will have selected a Metric template when you started your project. You can however tweak any of the units at any time. Just be careful of rounding issues though as project units such as inches don't convert nicely to millimeters. If you want to use change the units for future projects, update the units on your project template(s).
As an example of using type of parameters wisely, I am going to create a new Shared Parameter for Brief Area which will represent the area provided by my client for a room. I am also going to add another Shared Parameter for Included in Brief which will use a Yes/No type of parameter so that I can sort out rooms which were not included in the brief.

After adding the parameters as per Post 1, you should see them in the properties window.

Notice, the Brief area has 3 decimal places and shows the square meters symbol after the value and the Included in Brief uses a tick box. Add an area and tick the box for one or more rooms.
Now we can do some smart things in schedules. Open up the room schedule or create a new schedule for Rooms. Add the Area, Brief Area, and Included in Brief fields.

In the Filter tab, select Included in Brief equals Yes. You will only be offered Yes or No as the Yes/No unit type restricts the values to Yes or No.

The schedule should look similar to this one. Note: The room areas are round to 0 decimal places. This is set by the Project Units and can be changed at any time.

I want to know the difference between the Area of the room and the brief area. To do this, in the Fields tab, click on the Calculated value button.
Give the Calculated value a logical name. The Formula will be Area - Brief Area.

We have a schedule of all rooms included in the brief with the difference in areas between the brief and actual areas. Just to highlight the rooms that are less than the brief area, I will add some formatting.

In the Formatting tab, click Conditional Formatting. Select Difference as the fields and the test condition being less than 0. Select red as the background color.

There you go.

Schedules is a topic unto itself so I am not going to dig any deeper into what can be done here.
Summary
The important lesson is that the type of parameter is important for 3 reasons:- It restricts the values that can be entered to values that match the project units for that type.
- Values are displayed with the appropriate symbols for the type of parameter e.g. m2
- Parameter types with the same project units can be calculated using formulas
No comments:
Post a Comment
(“Post your comments below”),