Here is a basic run down on how to use Revisions and Revision Clouds.


You can draw multiple revision clouds on multiple views, you can tag them to the same revision description.


Here you can number the revisions Per Sheet or Per Project, meaning if you choose to number revisions by Sheet it will number the revisions sequentially regardless of what sheet it is placed on.
On sample #1 I have my Revisions set to Per Project, so my 4th Revision is number 4.


Each Revision number matches the number in the Revision box on the sheet.
 On the Sheet Issues/Revisions dialog box you can keep track of whether or not the Revision had been issues as well as by whom and who too. checking this box will lock your revision making it impossible to delete the cloud.
I typically have two types of Revisions, one that is related to a revision cloud and one that is related to the issue date of the drawing(s). I also combine these both into one revision schedule.
Revisions can be specific to one sheet or cover all sheets depending upon what you want.
Lets start from the beginning.
Revision Clouds: Revision Clouds indicate an area on the drawing that has been revised after the initial issue of the drawings. Add a revision cloud from the Revision Cloud tool on the Detail panel under the Annotate tab.
Under the properties of the Revision Cloud you can assign the appropriate Revision, a mark number and any comments.
Using the Tag by Category tool tag your Revision cloud.

At this point if you create multiple Revision Clouds and Tag them it will only be the number 1 as currently there are no other "Revisions" created yet.
Under the View tab on the Sheet Composition tab you'll find the Revisions tool.
This will open up a dialog box where you can add additional Revisions.
Here you can number the revisions Per Sheet or Per Project, meaning if you choose to number revisions by Sheet it will number the revisions sequentially regardless of what sheet it is placed on.
If you choose by Project your revisions will be blank (even after you have assigned the revision to the cloud) until you place that view on a sheet at which time Revit will then assign a number starting at #1.
On sample #1 I have my Revisions set to Per Project, so my 4th Revision is number 4.
 |
| Sample 1 |
If I add another revision (#5) on another view on another sheet and than added #6 to this view on this sheet it will then be placed directly under my #4.

On sample 2 I have the revisions set to Per Sheet.
 |
| Sample 2 |
Note: If you switch it after you have placed revision tags it will war you that Revit will change the numbers.
Here you see Cloud #1 refers to my fourth revision, revisions number 2 and 3 can be another sheet and would be numbered 1 and 2 on that sheet.
Each revision on the view that resides on that sheet is numbered sequentially starting at 1 regardless of the revision number on the Sheet Issues/Revisions dialog box. See Sample 3.
 |
| Sample 3 |
Revisions will only show up on the revision schedule (yes its a schedule imbedded into your template) of the sheet that the view where the Revision Tag/Cloud resides.
So I typically set mine to Per Project.
 On the Sheet Issues/Revisions dialog box you can keep track of whether or not the Revision had been issues as well as by whom and who too. checking this box will lock your revision making it impossible to delete the cloud.
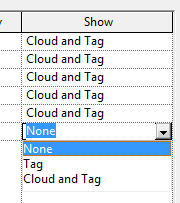
The Show column determines whether or not you will see the cloud and only the tag or neither cloud or tag.
This is where you can get sneaky and create a "ISSUES FOR REVIEW" revision, place a cloud and tag on each view and select None under the Show option to get the Issues for Review in the Issue Description Box on your sheets.
No comments:
Post a Comment
(“Post your comments below”),